How to ensure that images are watermarked at the right times
Have you ever needed your images to be watermarked upon publication? Whether you’re required to do so by law or if you want to prevent externals from copying your content, watermarking is a good way of altering an image to the outside world.
However, such processes are often manual. It’s also common to experience an explosion in duplicates and additional files when having to download, edit, and upload your image again - this time, a watermarked version of it.
While some organizations can choose to simply avoid watermarking, others have little to no choice in the matter and risk being left with a higher workload and unnecessary files. An example of this is organizations using retouched images for marketing purposes in Norway due to a new regulation enforced by the Norwegian Consumer Authority.
LEARN MORE: 6 Challenges all marketing teams face when managing digital assets
In this blog post, we’ll explain how you can use Fotoware to ensure that the right images are watermarked at the right times, using this regulation as an example.
Complying with the Norwegian Consumer Authority’s regulations for retouched images
As of July 1st, 2022, the Norwegian Marketing Control Act demands all marketing images where a person’s body shape, size, or skin is altered to be clearly marked upon publication. This goes for all forms of advertisement, including social media, flyers, influencer marketing, website, and more. The watermark is of a standardized format, with strict rules regarding its size and visibility.
With this law for labelling retouched advertising, the Norwegian Consumer Authority aims to promote body positivity by raising awareness of the fact that advertisements don’t always tell the truth and, ultimately, reducing the usage of retouched images within marketing.
While some organizations respond to this regulation by eliminating their use of retouched images, others may have limited options here. For example, if they’re a part of an international enterprise or if they’re cooperating with influencers, local marketers may not be able to make this change.

This poses several challenges, especially for larger teams. A typical problem is ensuring transparency within the organization, making it clear which images are retouched and which are not. If this is not adequately marked, you risk team members asking around or digging through emails to find such information. Another problem may be the watermarking itself, often resulting in a lengthy manual process, where images must be downloaded, uploaded to the editing software, downloaded from there, and uploaded again.
Learn more: Digital Rights Management (DRM): Protecting your digital assets by managing access and copyright
How Fotoware helps label retouched images in 2 simple steps
Step 1. Use markers
The process of complying with the regulation outlined above can be broken down into two separate steps: Being able to tell which images that are retouched and watermarking these. The first of these is easily solved in Fotoware through markers.
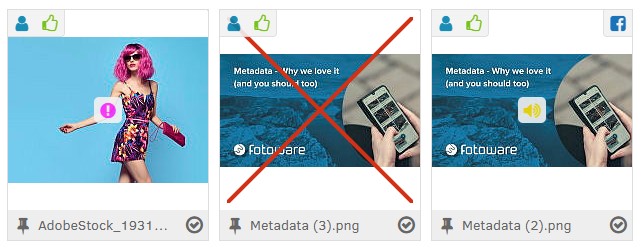
Explained in short, markers are tiny icons that, when triggered, appear on an asset’s thumbnail, aiming to communicate something about it. They can be customized in great detail and are directly tied to a specific metadata field. For example, you can have markers illustrating the file type (png, jpg, etc.) or whether or not the asset is used for a specific campaign or channel.

In this specific case, it would be beneficial to create a custom marker to indicate whether a person in an image has had his/her appearance altered. This way, everyone working with the images will be able to quickly tell which that are retouched and which are not.
Step 2. Enable a processing profile with a watermark
Once your team is able to easily tell which images need watermarking, the next step is to ensure that the watermarks are accessible when downloading the images.
 Transparency in editing: This image is labeled ‘Retouched Person’ to ensure authenticity in visual content.
In Fotoware, this process begins by uploading the watermark(s) to the system. We recommend uploading them in different sizes, so you’ll have multiple options depending on your images' dimensions.
LEARN MORE: Macros - The fastest way to apply metadata to your assets
Next, you’ll move on to your processing profiles. Here, you simply create new ones, this time with your selected watermark. Once that’s done, you simply attach these to your selected processing profile set(s). Which set you use may depend on the archive, so make sure to attach the suitable profiles to the right set.
Now, your watermark should be available when using the “crop & download” function. We recommend using pre-determined dimensions and marking these clearly, so the users know which processing profile to match with which image size. If this is set up correctly, complying with the Norwegian Marketing Control Act for retouched images should be an easy task.
Want to learn more about DAM?
Talk to one of our experts to discover how we can streamline your organization's content workflows.
Related blog posts
-
 Digital Asset Management
Protecting assets from authorized use through DRM
Unauthorized use of digital assets can create serious headaches for organizations managing digital assets.
-
 Customer Stories
How Financial Times got control over image rights
Assuming control over image rights helped FT support remote work. -
 GDPR
GDPR5 things you should know about GDPR for images
Learn 5 facts about GDPR for images to stay compliant and protect privacy with ease.

.png)
